Difference between revisions of "APF27 PPS"
m (→SSH terminal) |
|||
| (20 intermediate revisions by 6 users not shown) | |||
| Line 1: | Line 1: | ||
| + | [[Category: APF27]] | ||
==Description== | ==Description== | ||
PPS is an Armadeus System's baseboard for the [[APF27]] module. It can be used to implement and securize network applications such as routers and gateways. | PPS is an Armadeus System's baseboard for the [[APF27]] module. It can be used to implement and securize network applications such as routers and gateways. | ||
| Line 4: | Line 5: | ||
{|border=0 summary="Photos" | {|border=0 summary="Photos" | ||
|---------------- | |---------------- | ||
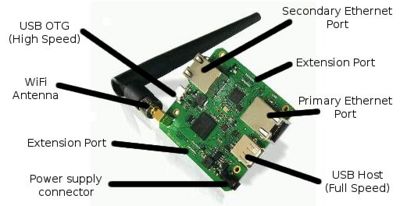
| − | | [[Image:PPS_recto.jpeg|center|thumb| | + | | [[Image:PPS_recto.jpeg|center|thumb|400px|Front side, you can see dual Ethernet, USB 2.0 Host & OTG, WiFi Antenna, extension connector footprint and power supply]] |
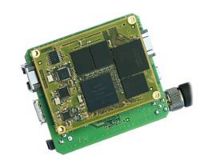
|| [[Image:PPS_verso.jpeg|center|thumb|200px|Back side, with an APF27 module plugged-in]] | || [[Image:PPS_verso.jpeg|center|thumb|200px|Back side, with an APF27 module plugged-in]] | ||
| Line 10: | Line 11: | ||
==Resources== | ==Resources== | ||
| + | * [[Datasheet | Datasheet and schema]] | ||
* [http://www.armadeus.com/english/products-development_boards-apf27_pps.html Product page on Armadeus Systems website] | * [http://www.armadeus.com/english/products-development_boards-apf27_pps.html Product page on Armadeus Systems website] | ||
| − | * [http://www.armadeus.com/_downloads/apf27_PPS/hardware | + | * [http://www.armadeus.com/_downloads/apf27_PPS/hardware Mechanical drawings] |
| − | + | ||
| − | + | ||
==Software features== | ==Software features== | ||
| Line 28: | Line 28: | ||
{{Note|You can also use the PPS test scripts located in ''/usr/local/pps/scripts'' on the system to test some software functionalities.}} | {{Note|You can also use the PPS test scripts located in ''/usr/local/pps/scripts'' on the system to test some software functionalities.}} | ||
| + | |||
| + | ==Build informations== | ||
| + | The following steps have to be performed to build PPS: | ||
| + | |||
| + | Armadeus 5.0 and later: | ||
| + | <pre class="host"> | ||
| + | # make pps_defconfig | ||
| + | # wget -Ppatches/linux/2.6.29 http://www.armadeus.com/_downloads/apf27_PPS/software_patches/501-pps-armadeus-fix_fxl4_bug.patch | ||
| + | # make | ||
| + | </pre> | ||
| + | |||
| + | Armadeus 4.1: | ||
| + | <pre class="host"> | ||
| + | # make pps_defconfig | ||
| + | # wget -Ppatches/linux/2.6.29 http://www.armadeus.com/_downloads/apf27_PPS/software_patches/501-pps-armadeus-fix_fxl4_bug.patch | ||
| + | # wget -Ppatches/u-boot/1.3.4 http://www.armadeus.com/_downloads/apf27_PPS/software_patches/360-pps-apf27.patch | ||
| + | # make | ||
| + | </pre> | ||
| + | |||
| + | |||
| + | Armadeus 4.0 and earlier: | ||
| + | <pre class="host"> | ||
| + | # make pps_defconfig | ||
| + | # wget -Pbuildroot/target/device/armadeus/linux/kernel-patches/2.6.29 http://www.armadeus.com/_downloads/apf27_PPS/software_patches/501-pps-armadeus-fix_fxl4_bug.patch | ||
| + | # wget -Pbuildroot/target/u-boot http://www.armadeus.com/_downloads/apf27_PPS/software_patches/u-boot-1.3.4-500-pps-apf27.patch | ||
| + | # make | ||
| + | </pre> | ||
==SSH terminal== | ==SSH terminal== | ||
| Line 46: | Line 73: | ||
==Debug / Development interface== | ==Debug / Development interface== | ||
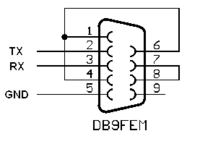
| − | In order to gain access to the serial port of the APF27 (U-Boot & Linux console), a small adapter cable has to be done. | + | * In order to gain access to the serial port of the APF27 (U-Boot & Linux console), a small adapter cable has to be done. |
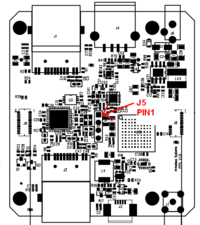
| − | A standard 2.54mm pin header connector (J5) allows accessing the TX and RX debug lines of the | + | A standard 2.54mm pin header connector (J5) allows accessing the TX and RX debug lines of the i.MX27. |
| − | The signals are compatible with a the | + | '''The signals are compatible with a the RS-232 standard (-12V/+12V) so no level translator is required when connecting it to your Host PC''' |
The pinout is described in the [http://www.armadeus.com/_downloads/apf27_PPS/documentation/pps_datasheet_v0A.pdf datasheet] and summarized here: | The pinout is described in the [http://www.armadeus.com/_downloads/apf27_PPS/documentation/pps_datasheet_v0A.pdf datasheet] and summarized here: | ||
| Line 63: | Line 90: | ||
|} | |} | ||
| + | |||
| + | * Now you have the debug access, you can [[Setup| install all the tools needed to control your board on your Host]]. | ||
| + | |||
| + | ==WiFi usage== | ||
| + | On PPS, WiFi/Libertas driver usage is a little bit different than on other platforms. Here are the things to know: | ||
| + | |||
| + | ===Drivers setup=== | ||
| + | You have to install Libertas SDIO and MMC drivers as modules to make Wi2Wi chipset work correctly on PPS (done by default): | ||
| + | <pre class="host"> | ||
| + | $ make linux-menuconfig | ||
| + | </pre> | ||
| + | |||
| + | <pre class="config"> | ||
| + | Device drivers ---> | ||
| + | [*] Network device support ---> | ||
| + | Wireless LAN ---> | ||
| + | [*] Wireless LAN (IEEE 802.11) | ||
| + | <M> Marvell 8xxx Libertas WLAN driver support | ||
| + | < > Marvell Livertas 8388 USB 802.11b/g cards | ||
| + | <M> Marvell Libertas 8385 and 8686 SDIO 802.11b/g cards | ||
| + | <M> MMC/SD/SDIO card support ---> | ||
| + | *** MMC/SD/SDIO Card Drivers *** | ||
| + | <M> MMC block device driver | ||
| + | </pre> | ||
| + | |||
| + | ===Initializing the connection=== | ||
| + | Before creating the WiFi connection, you must load the Libertas SDIO and the MMC modules: | ||
| + | <pre class="apf"> | ||
| + | # sh /usr/local/pps/scripts/reset_wi2wi.sh | ||
| + | |||
| + | # modprobe mxcmmc | ||
| + | i.MX SDHC driver | ||
| + | mmc0: new SDIO card at address 0001 | ||
| + | |||
| + | # modprobe libertas_sdio | ||
| + | lib80211: common routines for IEEE802.11 drivers | ||
| + | libertas_sdio: Libertas SDIO driver | ||
| + | libertas_sdio: Copyright Pierre Ossman | ||
| + | libertas_sdio mmc0:0001:1: firmware: requesting sd8686_helper.bin | ||
| + | libertas_sdio mmc0:0001:1: firmware: requesting sd8686.bin | ||
| + | libertas: 00:19:88:11:6b:d8, fw 9.70.3p36, cap 0x00000303 | ||
| + | eth1 (libertas_sdio): not using net_device_ops yet | ||
| + | libertas: PREP_CMD: command 0x00a3 failed: 2 | ||
| + | libertas: PREP_CMD: command 0x00a3 failed: 2 | ||
| + | libertas: eth1: Marvell WLAN 802.11 adapter | ||
| + | </pre> | ||
| + | |||
| + | Then all informations on [[Libertas_driver]] page apply. | ||
| + | |||
| + | ===Shutdown WiFi interface=== | ||
| + | You have to unload the MMC driver along with the Libertas SDIO if you want to completely shutdown the WiFi interface: | ||
| + | <pre class="apf"> | ||
| + | # ifconfig eth1 down | ||
| + | # rmmod mxcmmc | ||
| + | # rmmod libertas_sdio | ||
| + | </pre> | ||
| + | |||
| + | ===Reset Wi2Wi=== | ||
| + | To reset the chipset, you have to toggle the Wi2Wi ''RESET'' GPIO (PE11), by calling this script: | ||
| + | <pre class="apf"> | ||
| + | # sh /usr/local/pps/scripts/reset_wi2wi.sh | ||
| + | </pre> | ||
| + | |||
| + | ==Test scripts== | ||
| + | You can find test scripts in PPS' filesystem to help you to test the PPS' functionalities. | ||
| + | They are located in the directory ''/usr/local/pps/scripts'' but you can run them from any directory. | ||
| + | |||
| + | === Boa === | ||
| + | * '''File''' | ||
| + | ** init_boa.sh | ||
| + | * No argument | ||
| + | * '''Usage''': init_boa.sh | ||
| + | * '''Functionality''': Enable a web server with an interpreted HTML page accessible from outside the system. | ||
| + | |||
| + | === USB Gadget === | ||
| + | ==== Ethernet Gadget ==== | ||
| + | * '''File''' | ||
| + | ** test_ether_gadget.sh | ||
| + | * No argument | ||
| + | * '''Usage''': test_ether_gadget.sh | ||
| + | * '''Functionality''': Activate an Ethernet connection interface on the system through the USB Gadget port. | ||
| + | * '''Test''': Try to ping the system from your host PC on ''192.168.10.1''. | ||
| + | |||
| + | ==== RS232 Gadget ==== | ||
| + | * '''File''' | ||
| + | ** test_rs232_gadget.sh | ||
| + | * No argument | ||
| + | * '''Usage''': test_rs232_gadget.sh | ||
| + | * '''Functionality''': Enable a RS232 connection interface on the system through the USB Gadget port. | ||
| + | * '''Test''': Enter some datas or texts through /dev/ttyACM0 on your host PC. You should see the same datas displayed on the system. | ||
| + | |||
| + | === Bridge === | ||
| + | * '''File''' | ||
| + | ** test_bridge.sh | ||
| + | * No argument | ||
| + | * '''Usage''': test_bridge.sh | ||
| + | * '''Functionality''': Create a bridge through two connection interfaces on the system. | ||
| + | |||
| + | === SMSC95xx === | ||
| + | * '''File''' | ||
| + | ** test_ether_smsc95xx.sh | ||
| + | * No argument | ||
| + | * '''Usage''': test_ether_smsc95xx.sh | ||
| + | * '''Functionality''': Create an Ethernet connection interface through the Ethernet SMSC95xx port. | ||
| + | * '''Test''': Try to ping the address ''192.168.0.251'' on your host PC. | ||
| + | |||
| + | === Wifi === | ||
| + | ==== IWConfig ''(WEP)'' ==== | ||
| + | * '''File''' | ||
| + | ** test_wifi.sh | ||
| + | * No argument | ||
| + | * '''Usage''': test_wifi.sh | ||
| + | * '''Functionality''': Create a Wifi connection interface with [[Wifi|IWConfig ''(WEP encryption)'']]. | ||
| + | * '''Test''': Ping the address ''192.168.0.251'' on your host PC. | ||
| + | |||
| + | ==== WPA Supplicant ''(WPA/WPA2)'' ==== | ||
| + | * '''Files''' | ||
| + | ** init_wpa.sh | ||
| + | ** reset_wi2wi.sh | ||
| + | ** stop_wpa.sh | ||
| + | * '''Arguments''' | ||
| + | ** ''SSID'': Wifi connection SSID | ||
| + | ** ''PASSPHRASE'': Wifi connection passphrase | ||
| + | * '''Usage''': init_wpa.sh SSID PASSPHRASE | ||
| + | * '''Functionality''': Create a Wifi connection interface with [[WPA supplicant|WPA Supplicant ''(WPA/WPA2 encryption)'']]. | ||
| + | * '''Test''' | ||
| + | ** Ping the address ''192.168.0.251'' on your host PC. | ||
| + | ** To unable the connection, you can run ''stop_wpa.sh''. | ||
| + | ** To restart WPA Supplicant, first run ''stop_wpa.sh'' then ''init_wpa.sh'' again. | ||
| + | |||
| + | === OpenSSH === | ||
| + | * '''File''' | ||
| + | ** test_ssh_tunnel.sh | ||
| + | * '''Arguments''' | ||
| + | ** ''USERNAME'': the login of the user you want to connect on. | ||
| + | ** ''HOSTADDRESS'': the IP address of the host PC you want to connect on. | ||
| + | ** ''VIRTUALPORT'': the virtual port used to hide the encrypted port. | ||
| + | ** ''TELNETPORT'': the number of your Telnet port (must be same on the system and the host PC) | ||
| + | * '''Usage''': test_ssh_tunnel.sh USERNAME HOSTADDRESS VIRTUALPORT TELNETPORT | ||
| + | * '''Functionality''': Create a SSH connection between the system and your host PC on the Telnet port. | ||
| + | * '''Test''': To test it, launch a Wireshark on the host PC to check the datas on your host IP address. The password you type and the name of the [[Telnet]] protocol must be encrypted. | ||
| + | |||
| + | === IPSec === | ||
| + | * '''File''' | ||
| + | ** test_ipsec.sh | ||
| + | * '''Argument''' | ||
| + | ** ''IPADDRESS'': the system's IP address of the encrypted connection | ||
| + | * '''Usage''': test_ipsec.sh IPADDRESS | ||
| + | * '''Functionality''': Encrypt the connection between your host PC and the system. | ||
| + | * '''Test''' | ||
| + | ** Before running the script, edit the file ''/etc/ipsec-tools.conf'' and put the right IP addresses for the system and your host PC. | ||
| + | ** Launch Wireshark on your host PC on the encrypted connection's IP address. | ||
| + | ** Run [[Telnet]] on the system toward your host PC:<pre class="apf">telnet HOST_ADDRESS</pre> | ||
| + | ** Your login, password and the name of the [[Telnet]] protocol must be encrypted. | ||
==Feature list== | ==Feature list== | ||
| Line 80: | Line 261: | ||
===Wireless communication=== | ===Wireless communication=== | ||
| − | + | * [[Libertas driver|Wi2Wi chipset driver]] (see [[Libertas driver#Wi2Wi chipset|Wi2Wi Section]]) | |
| − | * [[Libertas driver|Wi2Wi chipset]] (see [[Libertas driver#Wi2Wi chipset|Wi2Wi Section]]) | + | * [[Wifi|WiFi usage on Linux]] |
|| | || | ||
Latest revision as of 08:42, 12 February 2015
Contents
Description
PPS is an Armadeus System's baseboard for the APF27 module. It can be used to implement and securize network applications such as routers and gateways.
Resources
Software features
There are some network applications/features that are preselected in the PPS baseboard default configuration:
- Encryption / Security
- USB Ethernet gadget support
- USB RS232 gadget support
- SMSC USB to Ethernet Adapter
- Boa Web Server
- Wireless tools (for securized WiFi with WEP encryption)
- WPA supplicant (for securized WiFi with WPA/WPA2 encryption)
| |
Note: You can also use the PPS test scripts located in /usr/local/pps/scripts on the system to test some software functionalities. |
Build informations
The following steps have to be performed to build PPS:
Armadeus 5.0 and later:
# make pps_defconfig
# wget -Ppatches/linux/2.6.29 http://www.armadeus.com/_downloads/apf27_PPS/software_patches/501-pps-armadeus-fix_fxl4_bug.patch
# make
Armadeus 4.1:
# make pps_defconfig
# wget -Ppatches/linux/2.6.29 http://www.armadeus.com/_downloads/apf27_PPS/software_patches/501-pps-armadeus-fix_fxl4_bug.patch
# wget -Ppatches/u-boot/1.3.4 http://www.armadeus.com/_downloads/apf27_PPS/software_patches/360-pps-apf27.patch
# make
Armadeus 4.0 and earlier:
# make pps_defconfig
# wget -Pbuildroot/target/device/armadeus/linux/kernel-patches/2.6.29 http://www.armadeus.com/_downloads/apf27_PPS/software_patches/501-pps-armadeus-fix_fxl4_bug.patch
# wget -Pbuildroot/target/u-boot http://www.armadeus.com/_downloads/apf27_PPS/software_patches/u-boot-1.3.4-500-pps-apf27.patch
# make
SSH terminal
The APF27 PPS filesystem is configured to enable SSH connection from a host computer. It allows you to access a system terminal through the default Ethernet port (the one aside USB Host connector).
- The default connection informations are:
- IP address: 192.168.0.10
- Login: guest
- Password: armadeus
- Then you can connect to your system by running the following command on your host:
$ ssh guest@192.168.0.10
- For more details, refer to the SSH - Dropbear page in the Wiki.
Debug / Development interface
- In order to gain access to the serial port of the APF27 (U-Boot & Linux console), a small adapter cable has to be done.
A standard 2.54mm pin header connector (J5) allows accessing the TX and RX debug lines of the i.MX27. The signals are compatible with a the RS-232 standard (-12V/+12V) so no level translator is required when connecting it to your Host PC
The pinout is described in the datasheet and summarized here:
- pin 1 (square pad): not connected
- pin 2: TX line (processor side)
- pin 3: RX line (processor side)
- pin 4: GND
- Now you have the debug access, you can install all the tools needed to control your board on your Host.
WiFi usage
On PPS, WiFi/Libertas driver usage is a little bit different than on other platforms. Here are the things to know:
Drivers setup
You have to install Libertas SDIO and MMC drivers as modules to make Wi2Wi chipset work correctly on PPS (done by default):
$ make linux-menuconfig
Device drivers  --->
    [*] Network device support  --->
        Wireless LAN  --->
            [*] Wireless LAN (IEEE 802.11)
            <M>   Marvell 8xxx Libertas WLAN driver support
            < >     Marvell Livertas 8388 USB 802.11b/g cards
            <M>     Marvell Libertas 8385 and 8686 SDIO 802.11b/g cards
    <M> MMC/SD/SDIO card support  --->
              *** MMC/SD/SDIO Card Drivers ***
        <M>   MMC block device driver
Initializing the connection
Before creating the WiFi connection, you must load the Libertas SDIO and the MMC modules:
# sh /usr/local/pps/scripts/reset_wi2wi.sh

# modprobe mxcmmc
i.MX SDHC driver
mmc0: new SDIO card at address 0001

# modprobe libertas_sdio
lib80211: common routines for IEEE802.11 drivers
libertas_sdio: Libertas SDIO driver
libertas_sdio: Copyright Pierre Ossman
libertas_sdio mmc0:0001:1: firmware: requesting sd8686_helper.bin
libertas_sdio mmc0:0001:1: firmware: requesting sd8686.bin
libertas: 00:19:88:11:6b:d8, fw 9.70.3p36, cap 0x00000303
eth1 (libertas_sdio): not using net_device_ops yet
libertas: PREP_CMD: command 0x00a3 failed: 2
libertas: PREP_CMD: command 0x00a3 failed: 2
libertas: eth1: Marvell WLAN 802.11 adapter
Then all informations on Libertas_driver page apply.
Shutdown WiFi interface
You have to unload the MMC driver along with the Libertas SDIO if you want to completely shutdown the WiFi interface:
# ifconfig eth1 down
# rmmod mxcmmc
# rmmod libertas_sdio
Reset Wi2Wi
To reset the chipset, you have to toggle the Wi2Wi RESET GPIO (PE11), by calling this script:
# sh /usr/local/pps/scripts/reset_wi2wi.sh
Test scripts
You can find test scripts in PPS' filesystem to help you to test the PPS' functionalities. They are located in the directory /usr/local/pps/scripts but you can run them from any directory.
Boa
- File
- init_boa.sh
- No argument
- Usage: init_boa.sh
- Functionality: Enable a web server with an interpreted HTML page accessible from outside the system.
USB Gadget
Ethernet Gadget
- File
- test_ether_gadget.sh
- No argument
- Usage: test_ether_gadget.sh
- Functionality: Activate an Ethernet connection interface on the system through the USB Gadget port.
- Test: Try to ping the system from your host PC on 192.168.10.1.
RS232 Gadget
- File
- test_rs232_gadget.sh
- No argument
- Usage: test_rs232_gadget.sh
- Functionality: Enable a RS232 connection interface on the system through the USB Gadget port.
- Test: Enter some datas or texts through /dev/ttyACM0 on your host PC. You should see the same datas displayed on the system.
Bridge
- File
- test_bridge.sh
- No argument
- Usage: test_bridge.sh
- Functionality: Create a bridge through two connection interfaces on the system.
SMSC95xx
- File
- test_ether_smsc95xx.sh
- No argument
- Usage: test_ether_smsc95xx.sh
- Functionality: Create an Ethernet connection interface through the Ethernet SMSC95xx port.
- Test: Try to ping the address 192.168.0.251 on your host PC.
Wifi
IWConfig (WEP)
- File
- test_wifi.sh
- No argument
- Usage: test_wifi.sh
- Functionality: Create a Wifi connection interface with IWConfig (WEP encryption).
- Test: Ping the address 192.168.0.251 on your host PC.
WPA Supplicant (WPA/WPA2)
- Files
- init_wpa.sh
- reset_wi2wi.sh
- stop_wpa.sh
- Arguments
- SSID: Wifi connection SSID
- PASSPHRASE: Wifi connection passphrase
- Usage: init_wpa.sh SSID PASSPHRASE
- Functionality: Create a Wifi connection interface with WPA Supplicant (WPA/WPA2 encryption).
- Test
- Ping the address 192.168.0.251 on your host PC.
- To unable the connection, you can run stop_wpa.sh.
- To restart WPA Supplicant, first run stop_wpa.sh then init_wpa.sh again.
OpenSSH
- File
- test_ssh_tunnel.sh
- Arguments
- USERNAME: the login of the user you want to connect on.
- HOSTADDRESS: the IP address of the host PC you want to connect on.
- VIRTUALPORT: the virtual port used to hide the encrypted port.
- TELNETPORT: the number of your Telnet port (must be same on the system and the host PC)
- Usage: test_ssh_tunnel.sh USERNAME HOSTADDRESS VIRTUALPORT TELNETPORT
- Functionality: Create a SSH connection between the system and your host PC on the Telnet port.
- Test: To test it, launch a Wireshark on the host PC to check the datas on your host IP address. The password you type and the name of the Telnet protocol must be encrypted.
IPSec
- File
- test_ipsec.sh
- Argument
- IPADDRESS: the system's IP address of the encrypted connection
- Usage: test_ipsec.sh IPADDRESS
- Functionality: Encrypt the connection between your host PC and the system.
- Test
- Before running the script, edit the file /etc/ipsec-tools.conf and put the right IP addresses for the system and your host PC.
- Launch Wireshark on your host PC on the encrypted connection's IP address.
- Run Telnet on the system toward your host PC:
telnet HOST_ADDRESS
- Your login, password and the name of the Telnet protocol must be encrypted.
Feature list
Wired communicationWireless communication |
Other
|
FPGA |


