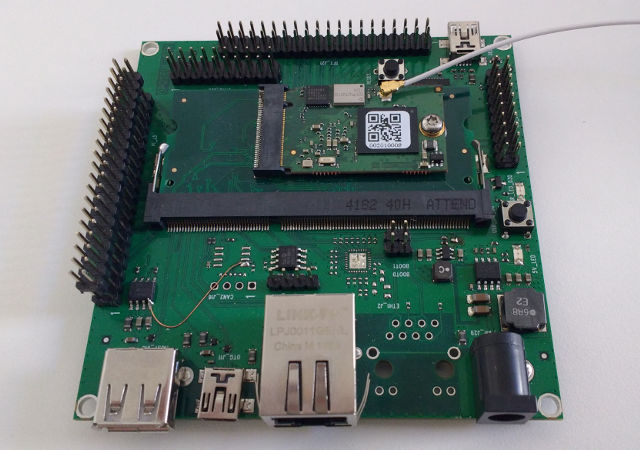
OPOS6ULDev used with an OPOS6UL NANO
From ArmadeusWiki
Page under construction...
 Informations on this page are not guaranteed !!
Contents
Description
The Armadeus System's standard development board/baseboard for the OPOS6UL module, the OPOS6ULDev, can also be used to evaluate OPOS6UL_NANO SoM. For this you will require a SODIMM adapter... and accept some limitations due to the lack of GPIOs on OPOS6UL_NANO modules, compared to OPOS6UL. Consider this usage as temporary, until OPOS6UL_NANO get the development board it deserves... Don't hesitate to do some lobby to Armadeus Systems hardware team ;-)...
Errata
- On OPOS6UL_Dev boards with hardware revision <= 1.2, the USB ports won't be powered unless you do an hardware modification. This modification consist of forcing to 3.3V, the 2 signals USB_OTG1_PWR & USB_OTG2_PWR on U3/AP2152 chip.
Resources
Feature list
| |
Note:
|
AudioVideo OutVideo In |
User InputWired communication |
Wireless communicationOther |
Connectors
- RPi compatible connector (J3):
| Linux GPIO or device | i.M6UL Mux | wiringPi N° | RPi name | Function | J3 Pin | J3 Pin | Function | RPi name | wiringPi N° | i.M6UL Mux | Linux GPIO or device |
|---|---|---|---|---|---|---|---|---|---|---|---|
| - | 3.3V | 1 | 2 | 5V | - | ||||||
| i2c-1 | UART5_RX_DATA | SDA1 | I2C data | 3 | 4 | 5V | - | ||||
| i2c-1 | UART5_TX_DATA | SCL1 | I2C clock | 5 | 6 | GND | - | ||||
| gpio9 | GPIO1_IO09__GPIO1_IO09 | 7 | GPIO7 | GPIO / AIN9 | 7 | 8 | UART Tx | TxD | UART2_TX_DATA__UART2_DCE_TX | ttymxc1 | |
| GND | 9 | 10 | UART Rx | RxD | UART2_RX_DATA__UART2_DCE_RX | ttymxc1 | |||||
| gpio113 | CSI_MCLK__GPIO4_IO17 | 0 | GPIO0 | GPIO | 11 | 12 | GPIO / AIN8 | GPIO1 | GPIO1_IO08__GPIO1_IO08 | gpio8 | |
| gpio114 | CSI_PIXCLK__GPIO4_IO18 | GPIO2 | GPIO | 13 | 14 | GND | |||||
| gpio122 | CSI_DATA05__GPIO4_IO26 | GPIO3 | GPIO | 15 | 16 | GPIO | GPIO4 | 4 | CSI_VSYNC__GPIO4_IO19 | gpio115 | |
| 3,3V | 17 | 18 | GPIO | GPIO5 | 5 | CSI_HSYNC__GPIO4_IO20 | gpio116 | ||||
| spidev1.x | CSI_DATA02__ECSPI2_MOSI | SPI MOSI | 19 | 20 | GND | ||||||
| spidev1.x | CSI_DATA03__ECSPI2_MISO | SPI MISO | 21 | 22 | GPIO | GPIO6 | 6 | CSI_DATA07__GPIO4_IO28 | gpio124 | ||
| spidev1.x | CSI_DATA00__ECSPI2_SCLK | SPI CLK | 23 | 24 | SPI_CS0 | CSI_DATA01__GPIO4_IO22 | spidev1.0 | ||||
| GND | 25 | 26 | NC | ||||||||
| i2c-0 | UART4_RX_DATA__I2C1_SDA | I2C Data | 27 | 28 | I2C clock | UART4_TX_DATA__I2C1_SCL | i2c-0 | ||||
| NC | 29 | 30 | GND | ||||||||
| NC | 31 | 32 | NC | ||||||||
| NC | 33 | 34 | GND | ||||||||
| NC | 35 | 36 | NC | ||||||||
| NC | 37 | 38 | NC | ||||||||
| GND | 39 | 40 | NC |
Tested RPi shields/hats
- Dragino Lora/GPS HAT... TO BE RETESTED !!!!
Tips
Bootstrap
- Bootstrap jumpers are not connected to OPOS6UL_NANO and so not useful with this SoM
U-Boot
- Use OPOS6ULDev "User" LED in U-Boot scripts:
- ON:
BIOS> gpio set 3
- OFF:
BIOS> gpio clear 3
- ON:
Linux
- to activate login in Framebuffer console, please uncomment /etc/inittab line 35 this way:
# Set up a getty on LCD
tty1::respawn:/sbin/getty 38400 tty1
Links
- RaspberryPi is a registered trademark of RaspberryPi Foundation.
